Amazon(AWS) SESは、簡単にメールの送信を行うことが出来る便利なサービスです。
AWSの管理画面上で一通りの設定をした後は、メールの送信&受信テストを行うと思いますが、それだけの為にわざわざプログラムを書いてテストするのは少し手間です。
そこで、シェルスクリプトを使用してメールの送信テストを手っ取り早く確認してみます。
(メール受信の確認は、使用しているメールクライアントやGmailなどのサービスで受信を確認します)
なお、参考にしたサイトは以下であり、内容もほぼ参考サイトのママです。
参考サイトの情報が消えた場合のバックアップも兼ね、使いやすく・分かりやすく少しアレンジして記事にしています。
Send emails via Amazon SES with Bash and cURL (Example)
https://coderwall.com/p/3vqf2g/send-emails-via-amazon-ses-with-bash-and-curl
目次
シェルスクリプトの内容
以下、コピーしてご使用ください。
なお、6〜8行目、13〜16行目は適宜置き換えてご使用ください。
1 2 3 4 5 6 7 8 9 10 11 12 13 14 15 16 17 18 19 20 21 22 23 24 25 26 27 28 29 30 31 32 33 34 35 | #!/bin/bash ################################################## # アクセスキーID/シークレットアクセスキー/リージョン の設定 ################################################## AWS_ACCESS_KEY="AKIxxxxx" # アクセスキーID AWS_SECRET_KEY="xxxxx" # シークレットアクセスキー REGION="us-west-2" # リージョン。米国東部 (バージニア北部):us-east-1、米国西部 (オレゴン):us-west-2、EU (アイルランド):eu-west-1 ################################################## # メールの送信者・受信者/件名/本文 の設定 ################################################## SUBJECT="<YOUR SUBJECT HERE>" MESSAGE="<YOUR MESSAGE HERE>" ################################################## # 処理 ################################################## date="$(date -R)" access_key="$AWS_ACCESS_KEY" priv_key="$AWS_SECRET_KEY" region="$REGION" signature="$(echo -n "$date" | openssl dgst -sha256 -hmac "$priv_key" -binary | base64 -w 0)" auth_header="X-Amzn-Authorization: AWS3-HTTPS AWSAccessKeyId=$access_key, Algorithm=HmacSHA256, Signature=$signature" endpoint="https://email.$region.amazonaws.com/" action="Action=SendEmail" source="Source=$FROM" to="Destination.ToAddresses.member.1=$TO" subject="Message.Subject.Data=$SUBJECT" message="Message.Body.Text.Data=$MESSAGE" curl -v -X POST -H "Date: $date" -H "$auth_header" --data-urlencode "$message" --data-urlencode "$to" --data-urlencode "$source" --data-urlencode "$action" --data-urlencode "$subject" "$endpoint" |
シェルスクリプトの実行結果
作成したシェルスクリプトを実行してみます。
実行権限を付与して実行しても良いですし、以下のようにbashを宣言して実行しても良いです。
1 2 3 4 5 6 7 8 9 10 11 12 13 14 15 16 17 18 19 20 21 22 23 24 25 26 27 28 29 30 31 32 33 34 35 36 37 38 39 40 41 42 43 44 45 46 47 48 49 50 51 52 53 | $ bash aws_ses.sh Note: Unnecessary use of -X or --request, POST is already inferred. * Trying 52.94.210.189... * TCP_NODELAY set * Connected to email.us-west-2.amazonaws.com (52.94.210.189) port 443 (#0) * ALPN, offering h2 * ALPN, offering http/1.1 * successfully set certificate verify locations: * CAfile: /etc/ssl/certs/ca-certificates.crt CApath: /etc/ssl/certs * TLSv1.2 (OUT), TLS handshake, Client hello (1): * TLSv1.2 (IN), TLS handshake, Server hello (2): * TLSv1.2 (IN), TLS handshake, Certificate (11): * TLSv1.2 (IN), TLS handshake, Server key exchange (12): * TLSv1.2 (IN), TLS handshake, Server finished (14): * TLSv1.2 (OUT), TLS handshake, Client key exchange (16): * TLSv1.2 (OUT), TLS change cipher, Client hello (1): * TLSv1.2 (OUT), TLS handshake, Finished (20): * TLSv1.2 (IN), TLS handshake, Finished (20): * SSL connection using TLSv1.2 / ECDHE-RSA-AES128-SHA * ALPN, server did not agree to a protocol * Server certificate: * subject: CN=email.us-west-2.amazonaws.com * start date: Dec 3 00:00:00 2018 GMT * expire date: Nov 29 12:00:00 2019 GMT * subjectAltName: host "email.us-west-2.amazonaws.com" matched cert's "email.us-west-2.amazonaws.com" * issuer: C=US; O=Amazon; OU=Server CA 1B; CN=Amazon * SSL certificate verify ok. > POST / HTTP/1.1 > Host: email.us-west-2.amazonaws.com > User-Agent: curl/7.58.0 > Accept: */* > Date: Fri, 10 May 2019 11:15:09 +0900 > X-Amzn-Authorization: AWS3-HTTPS AWSAccessKeyId=AKIAJPUIYSDYO2P3MJ2Q, Algorithm=HmacSHA256, Signature=7slMugXvpfnAdRRk4ozfAx/8TtfDVaqJ37HyRJLFNQc= > Content-Length: 244 > Content-Type: application/x-www-form-urlencoded > * upload completely sent off: 244 out of 244 bytes < HTTP/1.1 200 OK < x-amzn-RequestId: 7090526a-72c9-11e9-a469-1966e49a6e5d < Content-Type: text/xml < Content-Length: 326 < Date: Fri, 10 May 2019 02:15:10 GMT < <SendEmailResponse xmlns="http://ses.amazonaws.com/doc/2010-12-01/"> <SendEmailResult> <MessageId>0102018a7d25er65-49236579-a3h5-4k89-bmeg-1968195c35d7-000000</MessageId> </SendEmailResult> <ResponseMetadata> <RequestId>7360571b-76f3-21h8-a421-1956s48x2n0d</RequestId> </ResponseMetadata> </SendEmailResponse> * Connection #0 to host email.us-west-2.amazonaws.com left intact |
45〜52行目が実行結果のAWSからのレスポンスです。
上記は成功のレスポンスですが、失敗した場合は45〜52行目辺りにエラー内容が表示されます。
メールの受信確認
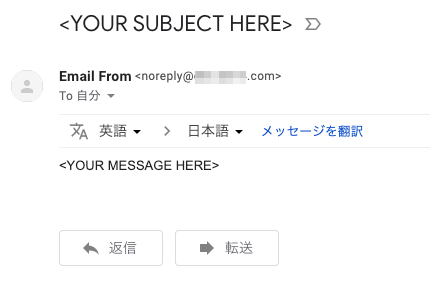
シェルスクリプトを実行して送信されたメールの受信を確認してみます。
以下はGmailのスクリーンショットですが、無事受信されていました。

最後に
シェルスクリプトを使用することで、メールの送信テストの為だけにわざわざAWSが提供しているSDKを組み込んでプログラムを書く必要が無く、簡単にテスト出来るようになりました。
Mac(執筆時:macOS Mojave 10.14.4)では、base64コマンドに-wのオプションが存在しておらず動作しないためご注意ください。(動確環境は記事最下に記載)
【動確環境】
OS:Ubuntu 18.04.1 LTS


コメントを残す